Custom mode for Subway WordPress Page Builder

One of my favorite Themes with the Page Builder need a custom extension for a module . Modded it once here i logged the process to remember for future upgrades. These topic will show how to add link parameter to the icon list modul for in Theme  Page Builder. Of course you can customise the same effect with the editor and some html lines but for Clients with no html knowledge its much easier to simply fill the module form and a additional field.

Icon-List

visually high value the Icon List Module the only part i missed is to add a link to the icon .  Its quite simple by extending the json parameter for that module . You have to edit the extend-vc.php file that can be found in your subway theme folder

wp-content/theme/subway/extendvc 

All modules are here defined by va_map arrays to exend our modul we need to add some link parameter to the array definition of the Icon list you can find it around line 777 . METAMODE is only a personal marker for myself to find changed code in a plugin.

//Icon List Item METAMODE
vc_map( array(
"name" => __("Icon List Item"),
"base" => "icon_list_item",
'admin_enqueue_css' => array(get_template_directory_uri().'/css/admin/vc-extend.css'),
"icon" => "icon-wpb-icon_list_item",
"category" => __('by QODE'),
"params" => array(
array(
"type" => "dropdown",
"class" => "",
"heading" => __("Icon"),
"param_name" => "icon",
"value" => $icons,
"description" => __("")
),
array(

Just add a additional textfield with link parameter inside the icon list array. After adding these part we only need to extend the part that renders the module.

Add input fields your icon-list module

array(
     "type" => "textfield",
     "holder" => "div",
     "class" => "",
     "heading" => __("Link"),
     "param_name" => "link",
      "value" => $link,
     "description" => __("")
),

To keep the Theme free for future update we will test to move the mode in our function or even better in a custom new plugin .

Full Extension for Function or WP Plugin copy & past these part below.

//Icon List Item METAMODE
vc_map( array(
"name" => __("Icon List Item"),
"base" => "icon_list_item",
'admin_enqueue_css' => array(get_template_directory_uri().'/css/admin/vc-extend.css'),
"icon" => "icon-wpb-icon_list_item",
"category" => __('by QODE'),
"params" => 
           array(
                "type" => "textfield",
                 "holder" => "div",
                 "class" => "",
                 "heading" => __("Link"),
                 "param_name" => "link",
                 "value" => $link,
                 "description" => __("")
                ),
)
) );

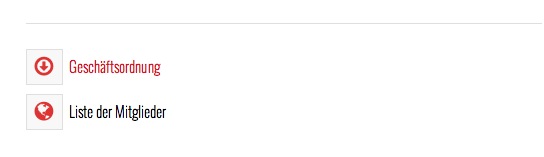
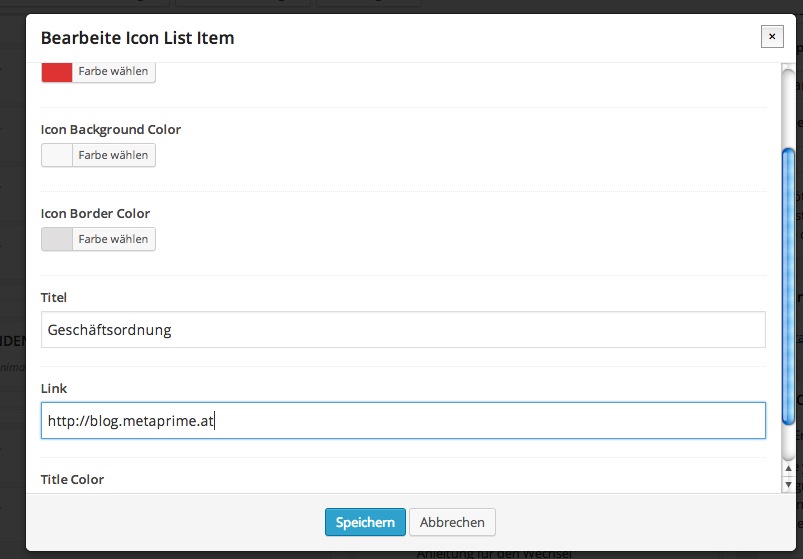
Now you added the additional Link Form to your module it should look like these in the Editor if you click the Pencil

Icon_List Editor

Still no link on the rendered Front page now we edit the rendering part. To edit the modul template file we need in

subway/inlcude/shortcodes.php

and add the new Link part to the Shortcode for the Icon list Shortcode part to the $html you find that around line 1353 depends on the theme version

Render the new link Icon list Shortcode

Finaly we need to change the icon list shortcode to render the link for the icon list for these we need to edit shortcodes.php

We add the additional html and extract the link attribute in the first line to make it short we only add the href part to the title
change  first function line to

extract(shortcode_atts(array("link"=>"","icon"=>"", "icon_color"=>"", "icon_background_color"=>"", "icon_border_color"=>"", "title"=>"","title_color"=>""), $atts));

and the link hmtl

$html .= '><a href="'.$link.'">'.$title.'</a></p>';

Finaly the new full shortcode for list icon will lock like below

/* Icon List Item shortcode */
/* Metamode */
if (!function_exists('icon_list_item')) {
function icon_list_item($atts, $content = null) {
	extract(shortcode_atts(array("link"=>"","icon"=>"", "icon_color"=>"", "icon_background_color"=>"", "icon_border_color"=>"", "title"=>"","title_color"=>""), $atts));
	$html = '';
	$html .= '<div class="icon_list">';
	$html .= '<!-- testlistshortcode -->';
	$html .= '<i class="'.$icon.' pull-left icon-border" ';
	if($icon_color != "" || $icon_background_color != "" || $icon_border_color != ""){
		$html .= 'style="';
		if($icon_color != ""){
			$html .= 'color:'.$icon_color.';';
		}
		if($icon_background_color != ""){
			$html .= 'background-color:'.$icon_background_color.';';
		}
		if($icon_border_color != ""){
			$html .= 'border-color:'.$icon_border_color.';';
		}
		$html .= '"';
	}
	$html .= '></i>';
	$html .= '<p';
	if($title_color != ""){
		$html .= ' style="color:'.$title_color.';"';
	}
	$html .= '><a href="'.$link.'">'.$title.'</a></p>';
	//$html .= '>'.$title.'</p>';
	$html .= '</div>';
	return $html;
}
}
add_shortcode('icon_list_item', 'icon_list_item');


The Orange

S eparated they live in Bookmarksgrove right at the coast of the Semantics, a large language ocean. A small river named Duden flows by their place and supplies it with the necessary regelialia. It is a paradisematic country, in which roasted parts of sentences fly into your mouth. Even the all-powerful Pointing has no control about the blind texts it is an almost unorthographic life One day however a small line of blind text by the name of Lorem Ipsum decided to leave for the far World of Grammar. The Big Oxmox advised her not to do so, because there were thousands of bad Commas, wild Question Marks and devious Semikoli, but the Little Blind Text didn’t listen. She packed her seven versalia, put her initial into the belt and made herself on the way. l using her.Far far away, behind the word mountains, far from the countries Vokalia and Consonantia, there live the blind texts. Separated they live in Bookmarksgrove right at the coast of the Semantics, a large language ocean. A small river named Duden flows by their place and supplies it with the necessary regelialia.

But nothing the copy said could convince her

and so it didn’t take long until a few insidious

Copy Writers ambushed her

The Big Oxmox advised her not to do so, because there were thousands of bad Commas, wild Question Marks and devious Semikoli, but the Little Blind Text didn’t listen. She packed her seven versalia, put her initial into the belt and made herself on the way. When she reached the first hills of the Italic Mountains, she had a last view back on the skyline of her hometown Bookmarksgrove, the headline of Alphabet Village and the subline of her own road, the Line Lane. Pityful a rethoric question ran over her cheek, then she continued her way. On her way she met a copy.Separated they live in Bookmarksgrove right at the coast of the Semantics, a large language ocean. A small river named Duden flows by their place and supplies it with the necessary regelialia. It is a paradisematic country, in which roasted parts of sentences fly into your mouth. Even the all-powerful Pointing has no control about the blind texts it is an almost unorthographic life One day however a small line of blind text by the name of Lorem Ipsum decided to leave for the far World of Grammar. The Big Oxmox advised her not to do so, because there were thousands of bad Commas, wild Question Marks and devious Semikoli, but the Little Blind Text didn’t listen. She packed her seven versalia, put her initial into the belt and made herself on the way. l using her.Far far away, behind the word mountains, far from the countries Vokalia and Consonantia, there live the blind texts. Separated they live in Bookmarksgrove right at the coast of the Semantics, a large language ocean. A small river named Duden flows by their place and supplies it with the necessary regelialia.

Be My Guest

Lorem ipsum dolor sit amet, consectetur adipiscing elit. Praesent ullamcorper suscipit mi, id convallis risus ullamcorper eget. Aenean sagittis eros nec eros euismod, quis dapibus leo semper. Mauris rutrum viverra adipiscing. Read more Be My Guest

Mac Apache setup new DocumentRoot

Since most stuff get tested on my MAMP server i look for a second local test environment . Some server related packages are just much easier to install under Apache than to compile it for MAMP.  Default MAMP port is 8888 and some software need the default 80 port .

First of all i moves the default Apache directory from  /Library/WebServer/Documents

to my webdev disc www add near Line 173

# Mac ApacheServer port80
DocumentRoot "/Volumes/www/ApacheWebserver"

Therefore edited the Apache  httpd.conf  in /private/etc/apache2

to make it available under add ServerName Localhost

#
# ServerName gives the name and port that the server uses to identify itself.
# This can often be determined automatically, but we recommend you specify
# it explicitly to prevent problems during startup.
#
# If your host doesn't have a registered DNS name, enter its IP address here.
#
#ServerName www.example.com:80

ServerName localhost

And one more edit according to stackoverflow to access the folder near line 183

<Directory />
    #Options FollowSymLinks
    Options Indexes FollowSymLinks Includes ExecCGI
    AllowOverride All
    Order deny,allow
    Allow from all
</Directory>

Dont forget to restart the apache server with the Terminal command monitor in your console log if any error shown.

sudo /usr/sbin/apachectl restart

Subway WordPress Visual Composer Update

Just a short note to the Visual Conmposer how to included link with the icon-list modul. in  he Subway WordPress Theme some nice extra functions who make it much user friendly.

The list icon modul dont support to add links , with some lines of   code we can add the option to link the Icon List item  module.

These blogpost is also a reference for later on if the theme get updated .

Following Files need to be edited you find them in subway/include and extendvc directory

Finally we mode the short code function to include the $link in short code shortcodes.php

/* Icon List Item shortcode */
/* METAMODE */
if (!function_exists('icon_list_item')) {
function icon_list_item($atts, $content = null) {
extract(shortcode_atts(array("icon"=>"", "icon_color"=>"", "icon_background_color"=>"", "icon_border_color"=>"", "title"=>"", "link"=>"","title_color"=>""), $atts));
$html = '';
$html .= '<div class="icon_list">';
$html .= '<i class="'.$icon.' pull-left icon-border" ';
if($icon_color != "" || $icon_background_color != "" || $icon_border_color != ""){
$html .= 'style="';
if($icon_color != ""){
$html .= 'color:'.$icon_color.';';
}
if($icon_background_color != ""){
$html .= 'background-color:'.$icon_background_color.';';
}
if($icon_border_color != ""){
$html .= 'border-color:'.$icon_border_color.';';
}
$html .= '"';
}
$html .= '></i>';
$html .= '<p';
if($title_color != ""){
$html .= ' style="color: '.$title_color.';"';
}
$html .= '><a href="'.$link.'">'.$title.'</a></p>';
$html .= '</div>';
return $html;
}
}


Add the Form Label in : qode_shortcodes_icon_list_item.php

<div class="input">
<label>Link</label>
<input name="link" id="link" value="" maxlength="100" size="55" />
</div>

We add the extra array into  our new Link in extend-vc.php to extend the parameter for //Icon List Item
vc_map( array

//Icon List Item METAMODE

vc_map( array(  .....

array(
"type" => "textfield",
"holder" => "div",
"class" => "",
"heading" => __("Link"),
"param_name" => "link",
"value" => $link,
"description" => __("")
),


Nulla Magna

Lorem ipsum dolor sit amet, consectetur adipiscing elit. Morbi vitae dui et nunc ornare vulputate non fringilla massa. Praesent sit amet erat sapien, auctor consectetur ligula. Lorem ipsum dolor sit amet, consectetur adipiscing elit. Sed non ligula augue. Integer justo arcu, tempor eu venenatis non, sagittis nec lacus. Morbi vitae dui et nunc ornare vulputate non fringilla massa. Praesent sit amet erat sapien, auctor consectetur ligula.

How too Real Time track Facebook Likes with Google Analytics

Build your Like button on the Facebook Widget Page as you like it should look. Chose XFBML button type.  Inside the <fb:like  we place the javascript to fire a google tracking.

onclick="javascript: _gaq.push(['_trackPageview', 'yourpagepost.com/facebook']);"

<fb:like onclick="javascript: _gaq.push(['_trackPageview', 'yourpagepost.com/facebook']);" href="http://www.youtpagepost.com/" ><fb:like>

These methode is slightly different then the standard way adding the social tracking code on page  and with

FB.Event.subscribe

. Its more usable if you render the like buttons dynamic. For my case i will track that way unlikes on a multi like page with several hundred Like buttons .

You Google Analytics account must be approved for the Beta Program.   

FFMPEG install for MAMP OSX

Tinkering a lot to get FFmpeg running on a MAMP development environment.  Since I will  need it again here a step by step guide for non Linux or Mac Terminal Geeks like me to fix it.

First of all make clear that your system is clean and everything is linked as it should . FFMPEG needs/install a lot of libraries to convert .If a older install fail you simple can mess up and it get hard to find the missing or wrong linked part. Some great Blogs been a major part in debugging and showed me the path where to go mentioned at the end. We will need to compile ffmpeg for our MAMP php version here PHP 5.3.14  since our second PHP version for MAMP is PHP 5.4 we need to repeat the compile process for every version we whant ffmpeg running. Imagick is installed on my System so i will not go in detail for that but its needed for ffmpeg.so to work.

First Part run some general check to prove system consistense . Second part will guide step by step thrue isntall Third part will show some Errors and bugs and how to get around them.

1. General System Check open  Terminal we will make some general check of your system health.

brew doctor

Make sure Homebrew Packet manager is installed and all files linked +update

brew update

2. Installation preparation

  • Point to your MAMP install dir

export PATH=/Applications/MAMP/Library/bin:/Applications/MAMP/bin/php/php5.3.14/bin:/usr

Execute

  • which php pecl phpize

return :

/Applications/MAMP/bin/php/php5.3.14/bin/php
/Applications/MAMP/bin/php/php5.3.14/bin/pecl
/Applications/MAMP/bin/php/php5.3.14/bin/phpize

  • phpize -v

Configuring for:
PHP Api Version: 20090626
Zend Module Api No: 20090626
Zend Extension Api No: 220090626


  • Install ffmpeg 
  • sudo brew install ffmpeg

==> Downloading http://ffmpeg.org/releases/ffmpeg-1.2.4.tar.bz2

Check & Test your FFMPEG in Terminal

  • ffmpeg -v

ffmpeg version 1.2.4 Copyright (c) 2000-2013 the FFmpeg developers
built on Dec 29 2013 18:32:07 with gcc 4.2.1 (GCC) (Apple Inc. build 5666) (dot 3)
configuration: –prefix=/usr/local/Cellar/ffmpeg/1.2.4 –enable-shared –enable-pthreads –enable-gpl –enable-version3 –enable-nonfree –enable-hardcoded-tables –enable-avresample –enable-vda –cc=gcc-4.2 –host-cflags= –host-ldflags= –enable-libx264 –enable-libfaac –enable-libmp3lame –enable-libxvid
libavutil 52. 18.100 / 52. 18.100
libavcodec 54. 92.100 / 54. 92.100
libavformat 54. 63.104 / 54. 63.104
libavdevice 54. 3.103 / 54. 3.103
libavfilter 3. 42.103 / 3. 42.103
libswscale 2. 2.100 / 2. 2.100
libswresample 0. 17.102 / 0. 17.102
libpostproc 52. 2.100 / 52. 2.100

  • which ffmpeg

/usr/local/bin/ffmpeg

Look for every error or problem in the log file output !

Test in Terminal that ffmpeg is working from terminal with a simple command cd to a random folder with a video .mp4

  •  ffmpeg -i  video.mp4

will return video information like frame rate ect

If Imagick install missing

  • brew install ImageMagick

or

  • sudo pecl channel-update pecl.php.net
  • sudo pecl install imagick

Now lets Build the Extension  for MAMP

Install ImageMagick  required for the  PHP ffmpeg.so extension

Unpack and  Create directory for your PHP sources for your php version . Place it in the dir MAMP/bin/php/php5.3.14 /include/php If the dir dont exist create it


 Install ffmpeg-php 

  • svn co svn://svn.code.sf.net/p/ffmpeg-php/code/trunk ffmpeg-php-code
  • cd ffmpeg-php-code
  • phpize
  • . /configure
  • make install

A lot of log files and checks ….

———————————————————————-
Libraries have been installed in:
/Applications/MAMP/bin/php/php5.3.14/include/php/ffmpeg-php-code/ffmpeg-php/modules

———————————————————————-
Installing shared extensions: /usr/lib/php/extensions/no-debug-non-zts-20090626/

Here you will find you new compiled  ffmpeg.so  copy them to your MAMP extension folder


 Set MAMP Path for your FFMPEG 

Add the Extensions to your Mamp /conf /php5.3.14/ php.ini file

;;;;;;;;;;;;;;;;;;;;;;
; Dynamic Extensions ;
;;;;;;;;;;;;;;;;;;;;;;

extension=imagick.so

extension=ffmpeg.so

SET the Correct PATH for FFMPEG

On many Install tutorial i have seen that the path get not recognised and they add the path in the php file like these example .

exec(“/usr/local/bin/ffmpeg -i $srcFile $destFile 2>&1”, $output);

To prevent that specialy if we use other software and the code is written without path like . You need to set the ENV vars for MAMP !

exec(“ffmpeg -i $srcFile $destFile 2>&1”, $output);

  • Open MAMP Env file .

/Applications/MAMP/Library/bin/envars

Comment out if not already done !

#DYLD_LIBRARY_PATH=”/Applications/MAMP/Library/lib:$DYLD_LIBRARY_PATH”
#export DYLD_LIBRARY_PATH

Add the path of your FFMPEG and IMAGEMagick installation 

#METAMODE 2014 !Important ffmpeg path
export PATH=”$PATH:/usr/local/bin/”

#METAMODE 2014 path for imagmagic
export PATH=”$PATH:/usr/local/opt/imagemagick/bin/”

Dont forget to Restart MAMP to take effect

  • Install ffmpeg-php for PHP 
  • svn co https://ffmpeg-php.svn.sourceforge.net/svnroot/ffmpeg-php ffmpeg-php
  • cd ffmpeg-php/trunk/ffmpeg-php
  • phpize

Don’t forget to run ‘make test’


Some Error DEBUGING 

If you get any error like “Possible conflicting files are: ”  remove all files by hand ffmpeg will add recent version needet

If you get these kind of Error during ffmpeg-php you ffmpeg-php is not compatible , the version in the drupal tutorial point to a outdated version ffmpeg-php 0.6

include/php/ffmpeg-php/ffmpeg_movie.c:531: error: ‘AVFormatContext’

full error logs strungling on ffmpeg-php 


Check you Apache, in logs for any error

File PermissionProblems

MAMP is accesing ffmpeg in root by default MAMP php cant acces root files , so lets change permission on ffmpeg

ls -l /usr/local/bin/ffmpeg

returns -rwxr-xr-x

If you get any error reinstall ffmpeg with option overwrite brew will guide you quite nice

brew –overwrite ffmpeg

The Drupal Forum on MAMP 

Plesk add additional Codecs to ffmpeg Tutorial

Add Memcoder FFMPEg


MAMP ZEND INSTALL

Nachdem es etwas tricky sein kann die verschiedenen Frameworks und Erweiterungen zu installieren . Hier ein Step by Step Guide das aus verschiedenen Quellen zusammengetragen wurde. Da mehrere PhP Versionen Installiert sind und falls ich in die Bedrängnis komme das ganze zu wieder holen . MAMP hat sich als super stabile Entwicklungs Umgebung für mich bewährt . Etwas verwirrend kann es sein für ein nicht UNIX oder Server Mensch zwischen all den Versionen und MAC  Snow Laopard 10.6.8 eigenen Server zu unerscheiden.

Meine noch immer kostenlose MAMP Version 1.9  mit PHP 5.3.14 sowie PHP 5.4.4

Installiert sind aktuell Imagemagick für Bild Manipulation

ZEND Installation für MAMP 

ZEND für MAMP wird mit pecel instaliert doch hier ist aufzupassen das das pecel von MAMP verwendet wird.

Wir ziehen das Zend in ein SVN damit mit später leichter updaten können.

Wechseln in den Ordner von MAMP .

Erstellen SVN und zendframework Ordner

cd /Applications/MAMP/
mkdir svn
cd svn
mkdir zendframework
cd zendframework
svn checkout http://framework.zend.com/svn/framework/standard/trunk

Nun müssen wir die zend lbrary in der entsprechenden php.ini  hinzufügen via include_path . In  meinem Fall in der nähe der Zeile 400 ,die entsprechende

php.ini für PHP 5.3.14 findet sich in  /Applications/MAMP/conf/php5.3.14

ZEND Inlcude path
include_path = ".:/usr/lib/php:/usr/local/lib/php:/Applications/MAMP/svn/zendframework/trunk/library"

Zend Framework kommt auch mit einem Shell-Skript, das Sie mit RAD arbeitet (Rapid Application Deployment), Wir erstellen noch eine Verknüpfung zum Zend-Tools im Terminal, indem wir einen Alias ​​zu unserem Profil unter / etc / profile herstellen. Terminal wie MAMP neu starten damit die neuen Einstellungen aktiv werden.

Wir überprüfen ob soweit alles geklappt hat ,durch eine Versions abfrage

zf show version

Wir wechseln in unser webverzeichnis standard MAMP ist

cd /Applications/MAMP/htdocs/

Doch in meinem persönlichen fall da alle webprojekte auf einer eigenen Partition liegen mit namen wwww.

cd /Volumes/www

Der Übersicht wegen kommen alle Zend Projekte in einen eigenen Ordner

cd mkdir ZEND

Nichts leichter als das wir erstellen ein “test” Zend Projekt in unserem neuen MAMP Webordner mit

zf create project test

Sollte die Error message no permission kommen brauchen wir super user privileges einfach mit SUDO ausführen. Zend könnte noch etwas motzen da PHPUnit nicht eingebunden ist .

Creating project at /Volumes/www/ZEND/test
Note: This command created a web project, for more information setting up your VHOST, please see docs/README
Testing Note: PHPUnit was not found in your include_path, therefore no testing actions will be created.

Wer noch ein VHOST Virtual Host einrichten möchte für MAC Mountan Lion der Blog von echoditto beschreibt das in allen einzelheiten

PHPUNIT für MAMP instalation

Das war etwas mühsamer da alle gefundenen Anleitungen auf den ersten versuch für mich nicht funktionierten. PHPUnit setzt voraus das pear in aktueller Version installiert ist . Um zu überprüfen wo pear installiert ist ,das können auch mehrere Ordner sein je nach dem wie viel PHP Versionen man installiert hat.

locate bin/pear

Schlussendlich  Terminal, wir müsse  das pear von MAMP verwenden nicht die MAC eigene Version . In meinem fall für php5.3.14 benutzen wir den Pfad, anstelle dem Kürzel pear .

/Applications/MAMP/bin/php/php5.3.14/bin/pear

sudo pear install --alldeps phpunit/PHPUnit

Unknown remote channel: pear.symfony.com
phpunit/PHPUnit requires package "channel://pear.symfony.com/Yaml" (version >= 2.1.0)
No valid packages found

sudo /Applications/MAMP/bin/php/php5.3.14/bin/pear install symfony/YAML

/Applications/MAMP/bin/php/php5.3.14/bin/pear channel-discover pear.symfony.com

/Applications/MAMP/bin/php/php5.3.14/bin/pear install pear.symfony.com/Yaml

/Applications/MAMP/bin/php/php5.3.14/bin/pear install --alldeps pear.phpunit.de/PHPUnit

sudo /Applications/MAMP/bin/php/php5.3.14/bin/pear channel-update pear.php.net  

sudo /Applications/MAMP/bin/php/php5.3.14/bin/pear upgrade pear  

sudo /Applications/MAMP/bin/php/php5.3.14/bin/pear channel-discover pear.phpunit.de  

sudo /Applications/MAMP/bin/php/php5.3.14/bin/pear install --alldeps phpunit/PHPUnit

PHPUnit ist nun installiert will man es auch vom Terminal ausführen müssen wir noch

mv /Applications/MAMP/bin/php/php5.3.14/bin/phpunit /usr/local/bin/phpunit

ausführen. Wir testen wieder ob alles glatt gelaufen ist.

phpunit --version

.

Hilfreich waren MAMP/Zend  PHPUnit Manual 

Installation von pear und PHPUnit in die Standard MAC APACHE System Umgebung