As i would like to turn an Macbook OS El-Capitain as a ftp server for media exchange on my network with pure-ftpd
Replacing the build in ftp Server from OSX 10.11 with a more powerful pure-ftpd
There are many how-to for Linux user but rarely none for Mac user. The build in ftp use the System users to login in there respective home place . We want independent ftp user on a other drive for ftp use. These is more a Log-blog on a long path of fails.
Since El Captain have his own Ftp Server we must disable it to not get in conflict with pure-ftpd
Deactivate Standard FTP-Server sudo launchctl unload -w /System/Library/LaunchDaemons/ftp.plist
Setup ftp client to connect to ftp server on local:
brew install tnftp
Configure
/usr/local/etc/pure-ftpd.conf
After installing the Server and setting up the pure-ftpd.config i was on a hunt for some GUI Admin interface to manage the ftp user. A Solution not to old that run on these system .
Very good looks the webadmin Interface , with that you can
Make Folders for our FTP Server
mkdir /Volumes/www/FTPshare
chmod 777 /Volumes/www/FTPshare
How to setup virtual user for ftp and group
We create a new User ftpuser and a new group ftpgroup where we add our user ftpuser
sudo dscl . -create /Users/ftpuser

sudo dscl . -create /Users/ftpuser UserShell /bin/bash

sudo dscl . -create /Users/ftpuser RealName "FTP User"

sudo dscl . -create /Users/ftpuser UniqueID "1001"

sudo dscl . -create /Users/ftpuser PrimaryGroupID 20

sudo dscl . -create /Users/ftpuser NFSHomeDirectory /Users/ftpuser

sudo dscl . -passwd /Users/ftpuser mypassword
To find a user’s UID or GID in OSX, use theidcommand. To find a specific user’s UID, at the terminal prompt, enter:
id -u username
Replaceusernamewith the appropriate user’s username. To find a user’s GID, at the Unix prompt, enter:
id -g username
If you wish to find out all thegroupsa user belongs to, instead enter:
id -G username
If you wish to see the UID and all groups associated with a user, enteridwithout any options, as follows:
id username
User manager for PureFTPd
A Nice Gui Web Interface for PureFTPd from 2017 you can find here Github
Typical Problems that can occur
Permission Errors
550 Could not delete test.jpg: Permission denied
FTP Connection Errors
550
553
Sharing & Permissions always “fetching…”?
That generally means there is an Access Control List (ACL) or POSIX permission set for a user that doesn’t exist on that system. The UID doesn’t match any of the users. Custom permissions means you have ACLs set for that item.
Sometimes a singel page ends up to be bigger than the Screen. Google will penalty that kind of pages as not mobile friendly and from the user site its a glitsch to that result in a bad experience.
These kind of page bigger than screen can happen if you change content or a client extend an existing site-on longer pages it can be a hasle to find the ement that hang over the page boarder.
Here a little neet CSS that helps to identify the block or element in seconds. Just add one of the lines in the developer console on the page
body { margin: 30px; }
/* Optional: Add some margin to the body to add space and
see where your offending elements cross the line */
body * { border: 1px solid red; }
/* add a border to all other elements on the page */
body * { outline: 1px solid red; }
/* Alternate: add an outline to all elements on the page. Won’t effect box model */
Problems when installing Node on OSX with brews, the default node path on OSX. For some reason my node modules where all installed in /Users//.npm_packages and Node Modules end up here
/Users//.npm_packages/lib/.node_modules
This result in a lot of errors when i try to install JS-Minify for Sublime Text. special if i install modules Globally.
This is a BlogLog post to reproduce the path if sometime a similar Error occurs in my node environment. At the end you find the stackoverflow links who helped to solve most problems
Installing node through Homebrew can cause problems with npm for globally installed packages. .
$ rm -rf /usr/local/lib/node_modules
$ brew uninstall node
$ brew install node --without-npm
$ echo prefix=~/.npm-packages >> ~/.npmrc
$ curl -L https://www.npmjs.com/install.sh | sh
</code></p>
<p>to the new npm to PATH environment variable
<code class="prettyprint">$ export PATH="$HOME/.npm-packages/bin:$PATH"</code></p>
<p>To make the new Path permanent we add it to our .bash_profile add following line
<code>
#NODE GLOBAL PATH
PATH=$HOME/.npm-packages/bin:$PATH
</code></p>
<p>Reload the bash in Terminal</p>
<p><code>source ~/.bash_profile</code></p>
<p>Check PATH
<code>$ echo $PATH</code></p>
<p>Edit $PATH</p>
<p><span>vi $HOME/.bash_profile</span></p>
<h2>NODE Commands:</h2>
<p><code>$ npm config get prefix</code></p>
<p><strong><em>Show Version</em></strong></p>
<p>$ npm -v</p>
<p><strong><em>Show node Version</em></strong></p>
<p><span>$ node –version </span></p>
<p><em><strong>Get Path where NPM is installed</strong></em></p>
<pre class="lang-js prettyprint prettyprinted"><code><span class="pln">$ npm config </span><span class="kwd">get</span><span class="pln"> prefix</span></code>
Set the nvm default Dir DONT use Sudo
$ npm config set prefix /usr/local
List Global NPM Packages
$ npm list -g
Will show the global installation root regardless of current working directory.
Try to debug the Trello 2 WordPress Plugin , a wonderful idea but sadly the Plugin is not updated or supported by the developer now for quite a time .
Why is the concept of using a Trello board to edit & rearrange content on your website sweet ? Trello offers a very intuitive drag and drop style card system with a json api . This way we can reorganise content by simply dragging it from one place to a other we can assign multiple user to the board as editor , no WordPress skills or admin Editor rights are needed.
What the Plugin supports : Trello List and Cards
Shortcut Parameter : ID , type , link
How to find the Trello Board ID
To get temporary get the plugin work on the front end If your Board have a link like
What works : The authentication with your Trello account. REndering of your trello content with minimal styles – here is some work to do to make it realy sweet
What don’t works : The Selection of a Trello Card or Board ID in the admin section .
Trello API : Reffernce https://developers.trello.com/advanced-reference/board
Solution : Was to simple to believe , after a lot of code change and Trello APi Responds later . You need a Organization in your trello Board. as my Board was Private only the Plug don’t work in this mode and fail to update the Trello Ids in the admin screen .
Now its time to make something beautiful out of the simple links .
Saved Facebook Posts from Treallo
Recommended Twitter Follower from Trello
Team Post Planing from Trello with WP Front end
Google Material Cards from trello
Dynamic Member User List Sortable from Trello
Idea Board
ect
Test Cards from Trello embedded with the shortlink
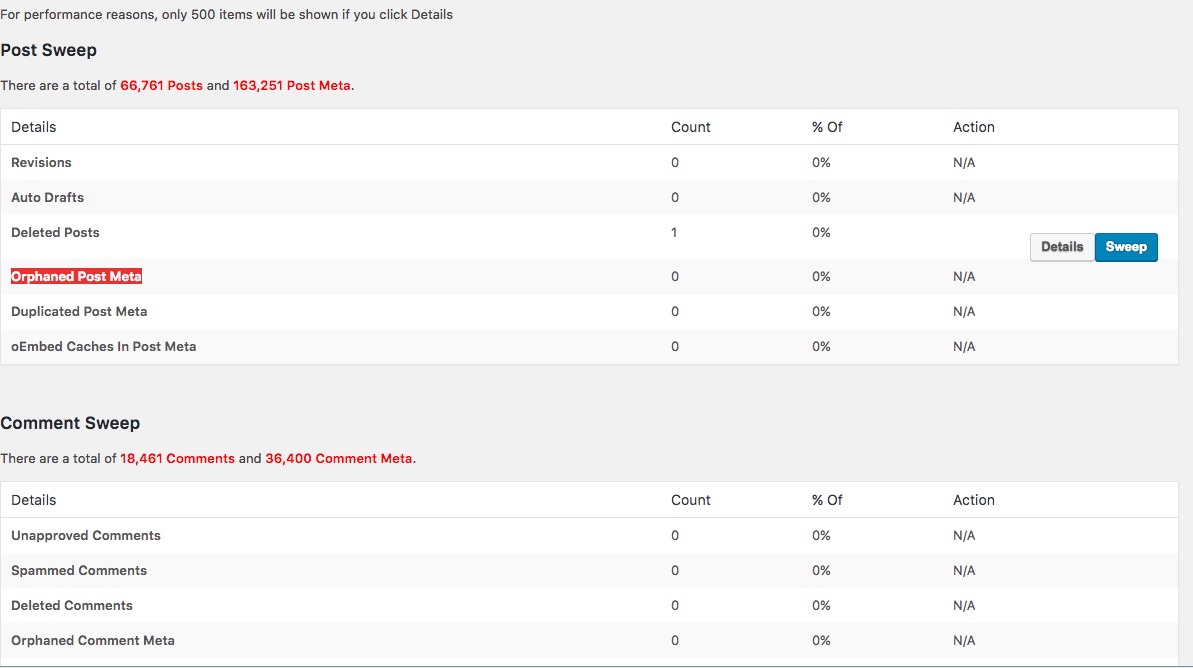
If your blog get agged probably it get slow . To clean up old SQL entrys there are several plugins but some time like in my case you need to delete millions of outdated Orphaned Post Meta , than plugins will timeout your SQL Database.
Especially if you experiment with post plugins loops can cause very fast tausend of duplicated post and metas.This is the first try to explore and dig a bit deeper into the Developer World , not only from the code and benefit side but also to learn more about the style and thinking that build the red line thru all his work . Many times phantastic people nearly disappear online and there Blogs get abandoned . Most likely one of the Big 5 IT cooperation already hired him and no time for free plugins or Blogging .
Revisiones
Auto drafts
Deleted comments
Unapproved comments
Spammed comments
Deleted comments
Orphaned post meta
Orphaned comment meta
Orphaned user meta
Orphaned term meta
Orphan term relationships
Unused terms
Duplicated post meta
Duplicated comment meta
Duplicated user meta
Duplicated term meta
Transient options
Optimizes database tables
oEmbed caches in post meta
Wp- Sweep is from the Developer Lester Chan a well known high profile WordPress Developer . The Plugin works smooth and clean following WordPress Tables and Terms as long they stay below 100.000 entry then it still works but can take extremely long and outtime your SQL Database on a shared hostThe image below show the wp sweep admin screen after cleanup .Of course before you make any change or clean up in your database dont forget the full backup . For a faster access i use a client like Sequel Pro to manage all the Databases<code>
DELETE pm
FROM wp_postmeta pm
LEFT JOIN wp_posts wp ON wp.ID = pm.post_id
WHERE wp.ID IS NULL
Since i just learn to work with brew and debug some build problems this is a little resoruce to help beginner who like compile there builds. This resource was created by experimenting with a custom MLT build. Read also the Formula Cookbook to learn more . Some note
Xcode is required for adding PHP modules
Brew install all kegs in a Cellar /usr/local/Cellar// and simlink them
How to modify brew scripts ?
Once downloaded all brew scripts can be found following dir . The ruby Install scripts can be edited or extended as you like
How to identify 32-bit and 64-bit file types on MacOS X ? With
file /usr/lib/fooooooo.dylib
Mac Terminal Permission
List all USER in Terminal
dscl . -list /Users UniqueID

Repair Home User Permission : Replace username with your username all lower case no space
sudo chown -R username:admin /Users/username
Show Logged in User Name
id -un
List all Groups
dscacheutil -q group
Edit PATH environment vars
Will open the bash_profile with your default editor , in our case with sublime text 2
touch ~/.bash_profile; open ~/.bash_profile
Apache Mac Terminal Commands
start apache Server
sudo apachectl start
Stop Terminate apache
sudo apachectl stop
Restart Apache from Terminal
sudo apachectl restart
Show Apache Version
httpd -v
apache start with terminal output for Error and debugging
apachectl -t
Common Brew install messages
Even after insalling a package dont mean its available for the system if its keg-only its not linked as the system have already a version. If you whant to build with that lib or package you must include the LDFLAGS and CPFLAGS in your make file or you can try to –force linking for your compile .
keg-Only
This formula is keg-only, which means it was not symlinked into /usr/local.

OS X already provides this software and installing another version in
parallel can cause all kinds of trouble.

Generally there are no consequences of this for you. If you build your
own software and it requires this formula, you'll need to add to your
build variables:

    LDFLAGS:  -L/usr/local/opt/curl/lib
    CPPFLAGS: -I/usr/local/opt/curl/include
First of all i have to mention that comping software i am very new to had just compiled ffmpeg and imagic for my Dev MAMP work field. But after got hot with image and video processing software like MLT . I just found the gorgeous branch stills2dv . Zooming probably is not the big thing but how the lib speed and slow up the pans and zooms is the best and most intuitive i have seen. Building the workfile is like writing a Text script how to zoom and Pan . Very simple if you have a bit of feeling for Pans & Zooms .
This stills2dv package have some very sweet Zoom and Pan options for still images but was build for Linux and some outdated lybs and commands made it a bit hard for me compile. for future i will note here what i change to get it work .Last but not least dropped in as i would like huge panorama images and return a video that can be shared on social media platforms like Facebook or Instagram. That as a terminal batch proces without opening any editing software.
Future idea is to create the workfile for pan zoom with a html editor.
First of all watch the video to get a impression what is the still2dv can do
First make sure you have the needed libs Installed
X11 installed
most likely this packages are already on your machine
libc gcc make libjpeg-dev libpng-dev
Some changes for the PATH to work on OSX below my make file with corrected paths. The only change was in the first lines -lXext and -lX11 made me some trouble till i installed XQuartz .
To run the Install you need also to adapt the install part since root:root doesn’t exist on osx .The install done manually in the terminal
One more change on s2d_png.c since libpng updated some commands will not work. My s2d_png.c following error found on stackoverflow
Chances are you are compiling IM with png.h from libpng-1.5.x but * Bugs png_longjmp” only exists inlibpng-1.5.x. * libpng-1.6.17 already installed
changeds2d_png.c to following . Mostly replaced the old format to the new strukture
png_create_info_struct
/**********************************************************************
 *
 * s2d_png.c
 *
 * Author: Denis-Carl Robidoux
 *
 * Copyrights and license: GPL v3 (see file named gpl-3.0.txt for details
 *
 *
 *
 ***********************************************************************/


#include <stdio.h>
#include <stdlib.h>
#include <string.h>
#include <unistd.h>
#include <errno.h>
#include <ctype.h>
#include <png.h>

#include "stills2dv.h"

Image *readpng(char *fn)
{
  unsigned char header[8]={0};
  int x, y, width, height;
  unsigned char *row;

  png_structp png_ptr;
  png_infop info_ptr;

  unsigned char  ** row_pointers;
  unsigned char *data;
  Image *img;
  FILE *in;
  TRACE;
  in = fopen(fn, "rb");
  if (!in)
    {
      fprintf(stderr," File %s could not be opened for reading", fn);
      return NULL;
    }
  if (fread(header, 1, 8, in)!=8)
    {
      fprintf(stderr, "Failed reading header of %s\n", fn);
      fclose(in);
      return NULL;
    }
  if (png_sig_cmp(header, 0, 8))
    {
      fprintf(stderr," File %s is not recognized as a PNG file", fn);
      fclose(in);
    }

  png_ptr = png_create_read_struct(PNG_LIBPNG_VER_STRING, NULL, NULL, NULL);

  if (!png_ptr)
    {
      fprintf(stderr," png_create_read_struct failed");
      fclose(in);
      return NULL;
    }

  info_ptr = png_create_info_struct(png_ptr);
  if (!info_ptr)
    {
      fprintf(stderr," png_create_info_struct failed");
    }

  if (setjmp(png_jmpbuf(png_ptr)))
    {
      fprintf(stderr," Error during init_io");
    }
  png_init_io(png_ptr, in);
  png_set_sig_bytes(png_ptr, 8);
  png_read_info(png_ptr, info_ptr);


  height = png_get_image_height( png_ptr,  info_ptr);
  width = png_get_image_width( png_ptr,  info_ptr);

  png_set_interlace_handling(png_ptr);
  png_read_update_info(png_ptr, info_ptr);
  if (setjmp(png_jmpbuf(png_ptr)))
    {
      fprintf(stderr," Error during read_image");
    }
  if((row_pointers = (unsigned char **) malloc(sizeof(unsigned char *) * height))==NULL)
    {
	fprintf(stderr, "Out of memory allocating rows index for png\n");
	png_destroy_info_struct(png_ptr, &info_ptr);
	//png_destroy_struct(png_ptr);
	return NULL;
    }
  for (y=0; y<height; y++)
    if((row_pointers = (unsigned char *) malloc(  png_get_rowbytes(png_ptr, info_ptr) ))==NULL)
      {
	    fprintf(stderr, "Out of memory allocating rows for png\n");
	    while(y>1)
	  {
	    free(row_pointers);
	  }
	free(row_pointers);
	png_destroy_info_struct(png_ptr, &info_ptr);
	//png_destroy_struct(png_ptr);
	return NULL;
      }
  png_read_image(png_ptr, row_pointers);
  fclose(in);
  if((img=(Image *)malloc(sizeof(Image)))==NULL)
    {
      fprintf(stderr, "Out of memory creating header while opening png\n");
      png_destroy_info_struct(png_ptr, &info_ptr);
      //png_destroy_struct(png_ptr);
      for (y=0; y<height; y++)
	free(row_pointers);
      free(row_pointers);
      return NULL;
    }
  memset(img, 0, sizeof(Image));

  if((img->data=(unsigned char *)malloc(width * height * 3))==NULL)
    {
      fprintf(stderr, "Out of memory for image while opening png\n");
      png_destroy_info_struct(png_ptr, &info_ptr);
      //png_destroy_struct(png_ptr);
      for (y=0; y<height; y++)
	free(row_pointers);
      free(row_pointers);
      free(img);
      return NULL;
    }
  if( png_get_color_type(png_ptr, info_ptr)  == PNG_COLOR_TYPE_RGB)
    {

      for (y=0;y<height;y++)
	{
	  memcpy(&img->data, row_pointers, width*3);
	}
    }else if ( png_get_color_type(png_ptr, info_ptr) == PNG_COLOR_TYPE_RGBA)
    {
      data=img->data;
      for (y=0;y<height;y++)
	{
	  row=row_pointers;
	  for(x=0;x<width;x++)
	    {
	      *(data++)=*(row++);
	      *(data++)=*(row++);
	      *(data++)=*(row++);
	      row++;
	    }
	}
    }else if (png_get_color_type(png_ptr, info_ptr) == PNG_COLOR_TYPE_GRAY)
    {
      data=img->data;
      for (y=0;y<height;y++)
	{
	  row=row_pointers;
	  for(x=0;x<width;x++)
	    {
	      *(data++)=*row;
	      *(data++)=*row;
	      *(data++)=*(row++);
	    }
	}
    }else if (png_get_color_type(png_ptr, info_ptr) == PNG_COLOR_TYPE_GRAY_ALPHA)
    {
      data=img->data;
      for (y=0;y<height;y++)
	{
	  row=row_pointers;
	  for(x=0;x<width;x++)
	    {
	      *(data++)=*row;
	      *(data++)=*row;
	      *(data++)=*(row++);
	      row++;
	    }
	}
    }else
    {
      fprintf(stderr, "Unsupported PNG format, we do not support indexed color (yet)\n");
      png_destroy_info_struct(png_ptr, &info_ptr);
      //png_destroy_struct(png_ptr);
      for (y=0; y<height; y++)
	free(row_pointers);
      free(row_pointers);
      free(img->data);
      free(img);
      return NULL;
    }
  img->width=width;
  img->height=height;
  png_destroy_info_struct(png_ptr, &info_ptr);
  //png_destroy_struct(png_ptr);
  for (y=0; y<height; y++)
    free(row_pointers);
  free(row_pointers);
  img->fn=strdup(fn);
  return img;
}
Now we are at the point that make and sudo make install works without any error.
IMPORTANT
We need XQuartz works fromOS X 10.6.3 till El Capitan , Download and install this part output the images to the window and will get started from the terminal as soon Showoutput get executed.
Nullam ornare, sem in malesuada sagittis, quam sapien ornare massa, id pulvinar quam augue vel orci. Praesent leo orci, cursus ac malesuada et, sollicitudin eu erat. Pellentesque ornare mi vitae sem consequat ac bibendum neque adipiscing. Donec tellus nunc, tincidunt sed faucibus a, mattis eget purus. Read more Portit mollis vitae